- Go 55.7%
- HTML 14.9%
- Svelte 13.3%
- JavaScript 11%
- Shell 2.1%
- Other 2.9%
|
All checks were successful
continuous-integration/drone/push Build is passing
|
||
|---|---|---|
| .gitlab-ci | ||
| admin | ||
| checker | ||
| configs | ||
| dashboard | ||
| doc | ||
| evdist | ||
| fickit-pkg | ||
| fileexporter | ||
| frontend/fic | ||
| generator | ||
| libfic | ||
| nixos | ||
| password_paper | ||
| qa | ||
| receiver | ||
| remote | ||
| repochecker | ||
| settings | ||
| udev | ||
| .dockerignore | ||
| .drone-manifest-fic-admin.yml | ||
| .drone-manifest-fic-checker.yml | ||
| .drone-manifest-fic-dashboard.yml | ||
| .drone-manifest-fic-evdist.yml | ||
| .drone-manifest-fic-frontend-ui.yml | ||
| .drone-manifest-fic-generator.yml | ||
| .drone-manifest-fic-get-remote-files.yml | ||
| .drone-manifest-fic-nginx.yml | ||
| .drone-manifest-fic-qa.yml | ||
| .drone-manifest-fic-receiver.yml | ||
| .drone-manifest-fic-repochecker.yml | ||
| .drone-manifest-fickit-deploy.yml | ||
| .drone.yml | ||
| .gitignore | ||
| .gitlab-ci.yml | ||
| default.nix | ||
| docker-compose.yml | ||
| Dockerfile-admin | ||
| Dockerfile-checker | ||
| Dockerfile-dashboard | ||
| Dockerfile-deploy | ||
| Dockerfile-evdist | ||
| Dockerfile-frontend-ui | ||
| Dockerfile-generator | ||
| Dockerfile-get-remote-files | ||
| Dockerfile-nginx | ||
| Dockerfile-qa | ||
| Dockerfile-receiver | ||
| Dockerfile-remote-challenge-sync-airbus | ||
| Dockerfile-remote-scores-sync-zqds | ||
| Dockerfile-repochecker | ||
| entrypoint-receiver.sh | ||
| fickit-backend.yml | ||
| fickit-boot.yml | ||
| fickit-frontend.yml | ||
| fickit-prepare.yml | ||
| fickit-update.yml | ||
| flake.lock | ||
| flake.nix | ||
| go.mod | ||
| go.sum | ||
| htdocs-admin | ||
| htdocs-dashboard | ||
| LICENSE | ||
| qa-add-todo.sh | ||
| qa-common.sh | ||
| qa-fill-todo.sh | ||
| qa-fill-view-overview.sh | ||
| qa-fill-view.sh | ||
| qa-merge-db.sh | ||
| README.md | ||
| renovate.json | ||
| shell.nix | ||
| update-deps.sh | ||
FIC Forensic CTF Platform
This is a CTF server for distributing and validating challenges. It is design to be robust, so it uses some uncommon technics like client certificate for authentication, lots of state of the art cryptographic methods and aims to be deployed in a DMZ network architecture.
Features
- Collaborative Challenge Design and Review: Facilitates large team collaboration for challenge creation and review.
- Versatile Flag Formats: Supports flags as strings, numbers, multiple-choice questions, unique-choice questions, selects, multiline inputs, and strings with capture regexp.
- Engaging Challenge Interface: A visually appealing interface that incorporates images to illustrate exercises.
- Public Dashboard: Allow spectators to follow the competition alongside players.
- Archival Mode: Preserve past challenges and data in a static form, with no code. Your archive can lied on a S3 bucket.
- Export Capabilities: Export challenges to other CTF platforms.
- Security-Focused: Designed with security as a top priority. Each service aims to be isolated with right restrictions. Answers are not stored in the database, ...
- Choose your Authentication: Authentication is not part of this project, integrate your own authentication methods.
- Extensible: Easily extend and customize the platform. The main codebase in Golang is highly documented, each frontend part can be recreated in another language with ease.
- Comprehensive Settings: A wide range of settings for challenge customization. You can have first blood or not, dynamic exercice gain, evenemential bonus, ...
- Git Integration: Seamless verification and integration with Git.
- Infrastructure as Code (IaC): Ensure read-only and reproducible infrastructure.
- Last-Minute Checks: Ensure your challenge is ready with a comprehensive set of checks that can be performed anytime, verifying that downloadable files are as expected by the challenge creators.
- Lightweight: Optimized for minimal resource consumption, supporting features like serving gzipped files directly to browsers without CPU usage.
- Scalable: Designed to handle large-scale competitions with multiple receivers and frontend servers, smoothly queuing activity peaks on the backend.
- Offline Capability: Run your challenges offline.
- Integrated Exercise Issue Ticketing System: Manage and track issues related to exercises during the competition directly with teams. During designing phase, this transform in a complete dedicated QA platform.
- Detailed Statistics: Provide administrators with insights into exercise preferences and complexity.
- Change Planning: Schedule events in advance, such as new exercise availability or ephemeral bonuses, with second-by-second precision.
- Frontend Time Synchronization: Ensure accurate remaining time and event synchronization between servers and players.
Overview
This is a monorepo, containing several micro-services :
adminis the web interface and API used to control the challenge and doing synchronization.checkeris an inotify reacting service that handles submissions checking.dashboardis a public interface to explain and follow the conquest, aims to animate the challenge for visitors.evdistis an inotify reacting service that handles settings changes during the challenge (eg. a 30 minutes event where hints are free, ...).generatortakes care of global and team's files generation.qais an interface dedicated to challenge development, it stores reports to be treated by challenges creators.receiveris only responsible for receiving submissions. It is the only dynamic part accessibe to players, so it's codebase is reduce to the minimum. It does not parse or try to understand players submissions, it just write it down to a file in the file system. Parsing and treatment is made by thechecker.remote/challenge-sync-airbusis an inotify reacting service that allows us to synchronize scores and exercice validations with the Airbus scoring platform.remote/scores-sync-zqdsis an inotify reacting service that allows us to synchronize scores with the ZQDS scoring platform.repocheckeris a side project to check offline for synchronization issues.
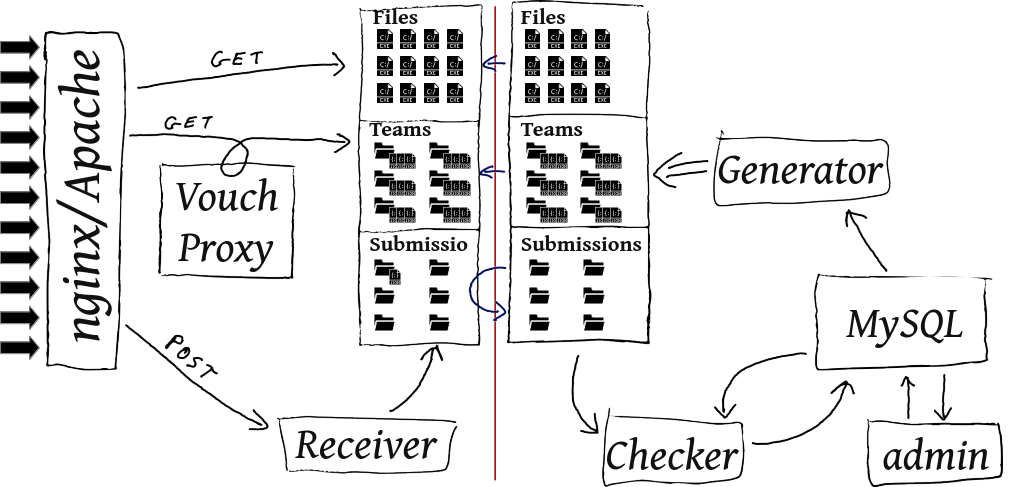
Here is how thoses services speak to each others:
In the production setup, each micro-service runs in a dedicated container, isolated from each other. Moreover, two physical machines should be used:
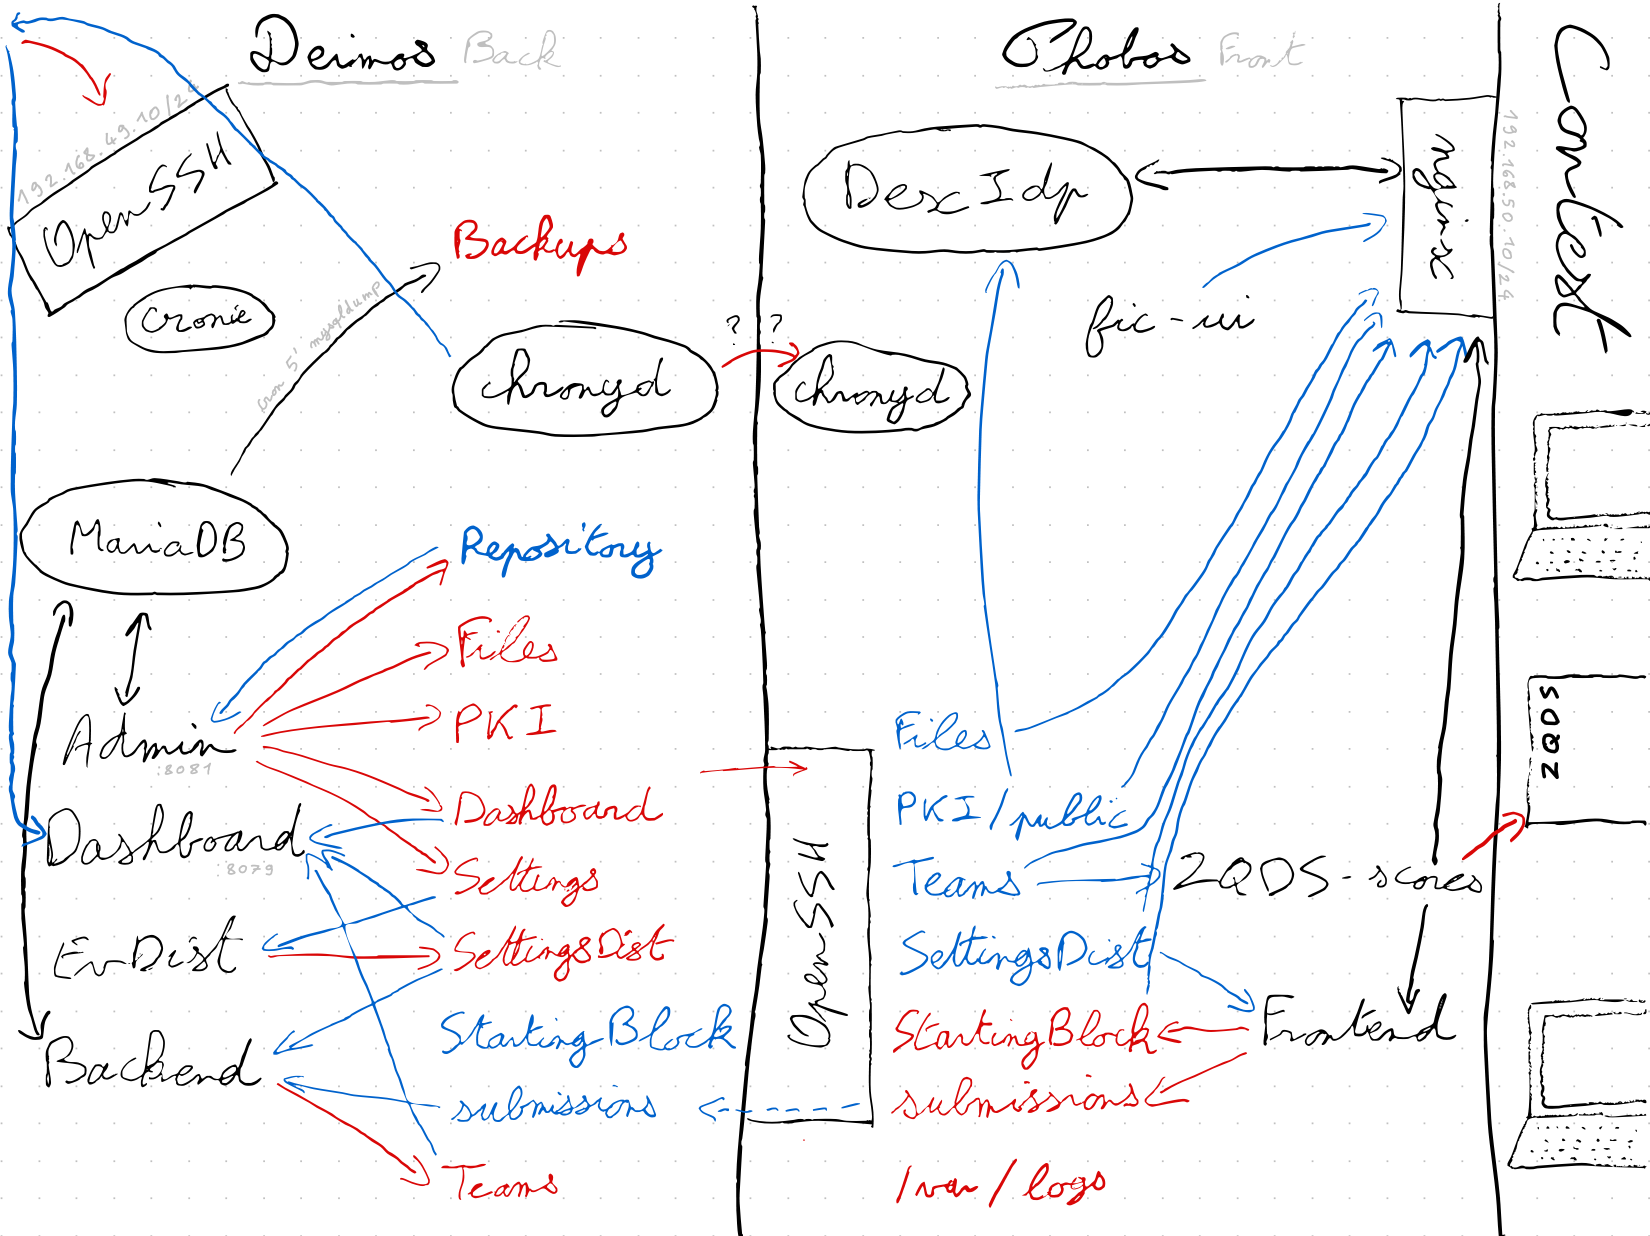
phoboscommunicates with players: displaying the web interface, authenticate teams and players, storing contest files and handling submissions retrieval without understanding them. It can't accessdeimosso its job stops after writing requests on the filesystem.deimosis hidden from players, isolated from the network. It can only accessphobosvia a restricted ssh connection, to retrieve requests fromphobosfilesystem and pushing to it newly generated static files.
Concretely, the L2 looks like this:
So, the general filesystem is organized this way:
DASHBOARDcontains files structuring the content of the dashboard screen(s).FILESstores the contest file to be downloaded by players. To be accessible without authentication and to avoid bruteforce, each file is placed into a directory with a hashed name (the original file name is preserved). It's rsynced as is todeimos.GENERATORcontains a socket to allow other services to communicate with thegenerator.PKItakes care of the PKI used for the client certiciate authorization process, and more generaly, all authentication related files (htpasswd, dexidp config, ...). Only thesharedsubdirectory is shared withdeimos, private key and teams P12 don't go out.SETTINGSstores the challenge config as wanted by admins. It's not always the config in use: it uses can be delayed waiting for a trigger.SETTINGSDISTis the challenge configuration in use. It is the one shared with players.startingblockkeep thestartedstate of the challenge. This helpsnginxto know when it can start distributing exercices related files.TEAMSstores the static files generated by thegenerator, there is one subdirectory by team (id of the team), plus some files at the root, which are common to all teams. There is also symlink pointing to team directory, each symlink represent an authentication association (certificate ID, OpenID username, htpasswd user, ...).submissionsis the directory where thereceiverwrites requests. It creates subdirectories at the name of the authentication association, as seen inTEAMS,checkerthen resolve the association regardingTEAMSdirectory. There is also a special directory to handle team registration.
Here is a diagram showing how each micro-service uses directories it has access to (blue for read access, red for write access):
Local developer setup
Using Docker
Use docker-compose build, then docker-compose up to launch the infrastructure.
After booting, you'll be able to reach the main interface at: http://localhost:8042/ and the admin one at: http://localhost:8081/ (or at http://localhost:8042/admin/). The dashboard is available at http://localhost:8042/dashboard/ and the QA service at http://localhost:8042/qa/.
In this setup, there is no authentication. You are identfied as a team. On first use you'll need to register.
Import folder
Local import folder
The following changes is only required if your are trying to change the local import folder ~/fic location.
Make the following changes inside this file docker-compose.yml:
23    volumes:
24 -     - ~/fic:/mnt/fic:ro
24 +     - <custom-path-to-import-folder>/fic:/mnt/fic:ro
Git import
A git repository can be used:
29 -    command: --baseurl /admin/ -localimport /mnt/fic -localimportsymlink
29 +    command: --baseurl /admin/ -localimport /mnt/fic -localimportsymlink -git-import-remote git@gitlab.cri.epita.fr:ing/majeures/srs/fic/2042/challenges.git
Owncloud import folder
If your are trying to use the folder available with the Owncloud service, make the following changes inside this file docker-compose.yml:
29 -    command: --baseurl /admin/ -localimport /mnt/fic -localimportsymlink
29 +    command: --baseurl /admin/ -clouddav=https://owncloud.srs.epita.fr/remote.php/webdav/FIC%202019/ -clouduser <login_x> -cloudpass '<passwd>'
Manual builds
Running this project requires a web server (configuration is given for nginx),
a database (currently supporting only MySQL/MariaDB), a Go compiler for the
revision 1.18 at least and a inotify-aware system. You'll also need NodeJS to
compile some user interfaces.
-
Above all, you need to build Node projects:
cd frontend/fic; npm install && npm run build cd qa/ui; npm install && npm run build -
First, you'll need to retrieve the dependencies:
go mod vendor -
Then, build the three Go projects:
go build -o fic-admin ./admin go build -o fic-checker ./checker go build -o fic-dashboard ./dashboard go build -o fic-generator ./generator go build -o fic-qa ./qa go build -o fic-receiver ./receiver go build -o fic-repochecker ./repochecker ... -
Before launching anything, you need to create a database:
 mysql -u root -p <<EOF
 CREATE DATABASE fic;
 CREATE USER fic@localhost IDENTIFIED BY 'fic';
 GRANT ALL ON fic.* TO fic@localhost;
 EOF
By default, expected credentials for development purpose is
fic, for both username, password and database name. If you want to use other credentials, define the corresponding environment variable:MYSQL_HOST,MYSQL_USER,MYSQL_PASSWORDandMYSQL_DATABASE. Those variables are the one used by themysqldocker image, so just link them together if you use containers. -
Launch it!
./fic-admin &After initializing the database, the server will listen on http://localhost:8081/: this is the administration part.
./fic-generator &This daemon generates static and team related files and then waits another process to tell it to regenerate some files.
./fic-receiver &This one exposes an API that gives time synchronization to clients and handle submission reception (but without treating them).
./fic-checker &This service waits for new submissions (expected in
submissionsdirectory). It only watchs modifications on the file system, it has no web interface../fic-dashboard &This last server runs the public dashboard. It serves all file, without the need of a webserver. It listens on port 8082 by default.
./fic-qa &If you need it, this will launch a web interface on the port 8083 by default, to perform quality control.
For the moment, a web server is mandatory to serve static files, look
at the samples given in the configs/nginx directory. You need to
pick one base configation flavor in the configs/nginx/base
directory, and associated with an authentication mechanism in
configs/nginx/auth (named the file fic-auth.conf in /etc/nginx),
and also pick the corresponding configs/nginx/get-team file, you
named fic-get-team.conf.


